A complete guide to make your first website online with HTTPS
Date:

1. Introduction
In today's digital era, having a website is crucial for individuals, businesses, and organizations alike. Whether you want to showcase your portfolio, promote your business, or establish an online presence, setting up a website has become more accessible than ever.
In this guide, we'll walk you through the step-by-step process of setting up your very own website, regardless of your technical expertise. We will setup a website to make it accessible online at https://jscoder.io.
2. Define your website's purpose and goals
Before diving into the technical aspects, it's essential to determine the purpose and goals of your website. Is it a personal blog, an e-commerce platform, or a portfolio to showcase your work? Understanding the purpose will help you make better decisions during the setup process.
3. Choose a domain name
A domain name is the address people will use to access your website, such as www.jscoder.io. It's important to select a catchy and memorable domain name that reflects your website's purpose. Consider using your business name or keywords related to your field.
Here, for example, we choose jscoder.io for a website for JavaScript developers to put share technical articles and other resources. There are tons of internet service providers where you can buy a domain name from. Some of them include:
Namecheap: https://www.namecheap.com
Godaddy: https://www.godaddy.com/
AWS Route 53: https://aws.amazon.com/route53/
NetworkSolutions: https://www.networksolutions.com/
AlibabaClound: https://alibabacloud.com
... ...
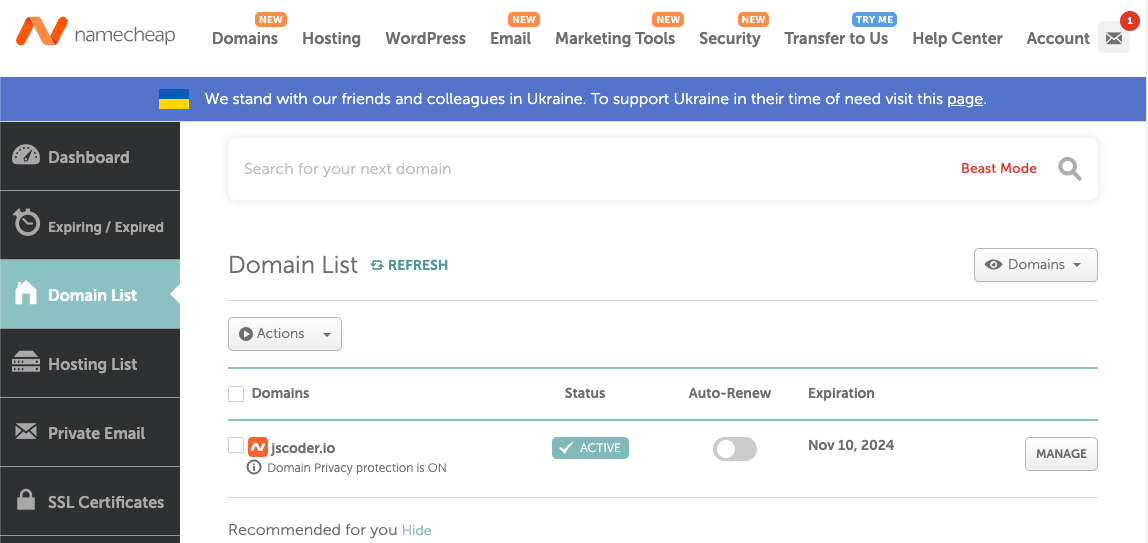
Simply register an account and buy a good domain name for your new website. We bought jscoder.io from NameCheap here. It will cost you $4 ~ $40 per year, depending on the domain name.
4. Find a web hosting provider
Web hosting is a service that allows your website to be accessible on the internet. Look for a reliable web hosting provider that offers good uptime, strong security measures, and excellent customer support. Usually, a domain name service provider also provides web hosting service. For non-techincal staff, it's popular to choose web hosting packages with built-in Content Management System (CMS) like WordPress, Wix, Joomla, etc.
For coders like me, I would prefer a more freedom and flexible option. I will code the website from scratch and deploy the source code. So a server is needed. To save cost, I will apply for some "virtual host", a shared virtual server assigned to me, acting as the web server to serve the website code.
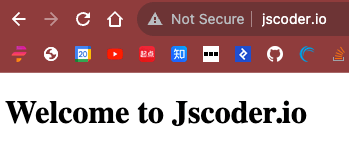
For example, my site https://jscoder.io has only one page index.html with simple text "Welcome to Jscoder.io.", then I will need to put the file "index.html" on a server, served by some server software like nginx. When user types in https://jscoder.io in his browser, the file "index.html" will be sent and rendered. There are still some blocks missing in the puzzle now, don't panic, we will show you step by step with real examples.
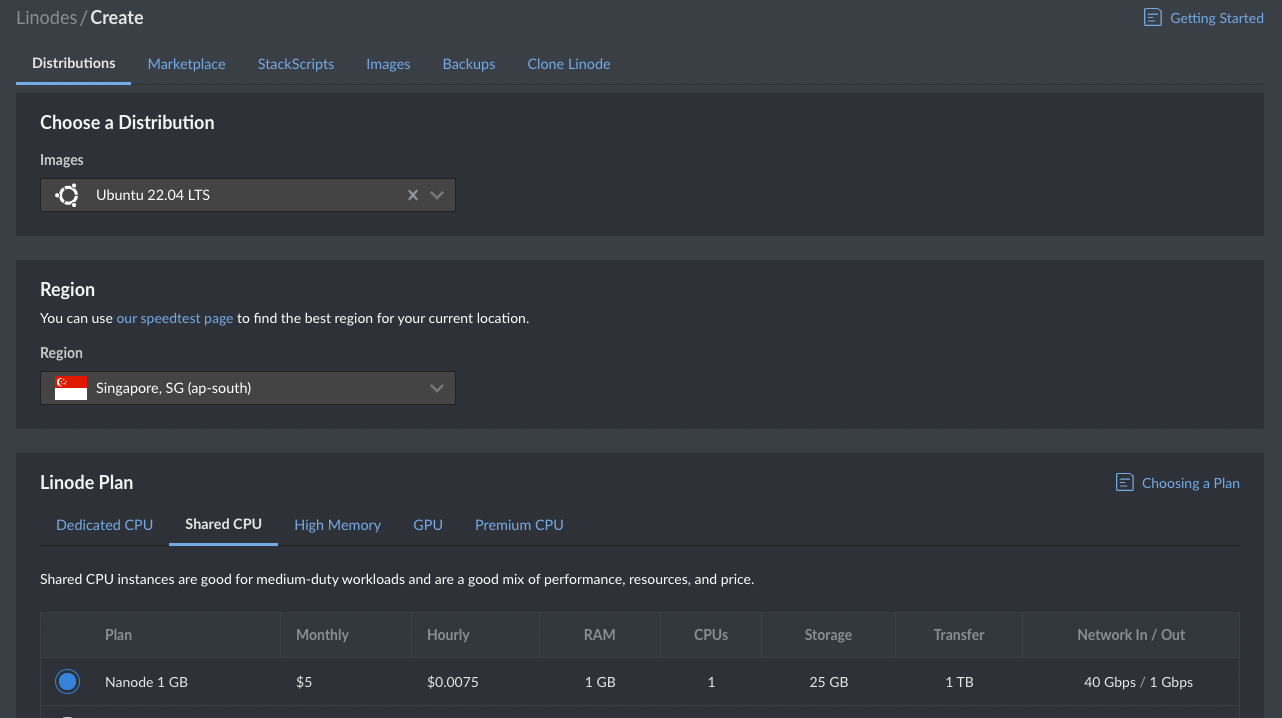
4.1 Buy a virtual server
Now, let's get a virtual server first. I choose Linode because of its simplicity and flexibility in scaling. Minimum node called "Nanode 1 GB" is sufficient for us. The cost will be $5 per month.
Great. The node (server) will be booted and ready for you within 1 minute. Now you own a server online and you can access it via SSH. Linode provides a public IP address for the new node, like 172.104.35.222, with default web portal 80 and 443 publicly available. For my case,
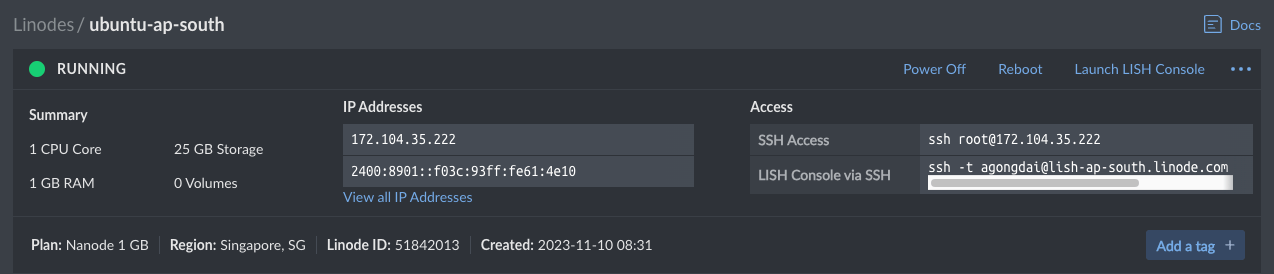
Copy the SSH command and run it on your terminal, you should be able to login to the server. Let's test whether it's working properly.
4.2 Configure the server
Let's install a server software nginx for our website. It's a software to host the website code, providing features like:
Reverse proxy with caching.
IPv6.
Load balancing.
FastCGI support with caching.
WebSockets.
Handling of static files, index files, and auto-indexing.
TLS/SSL with SNI.
Run this command to install nginx:
Create a bare simple index.html at /var/www/html/index.html with content below. You can easily do it through terminal text editor vim or vi:
Great, now the website is accessible publicly through IP. Type in http://172.104.35.222/ in your browser, boom :)

5. Domain name to IP
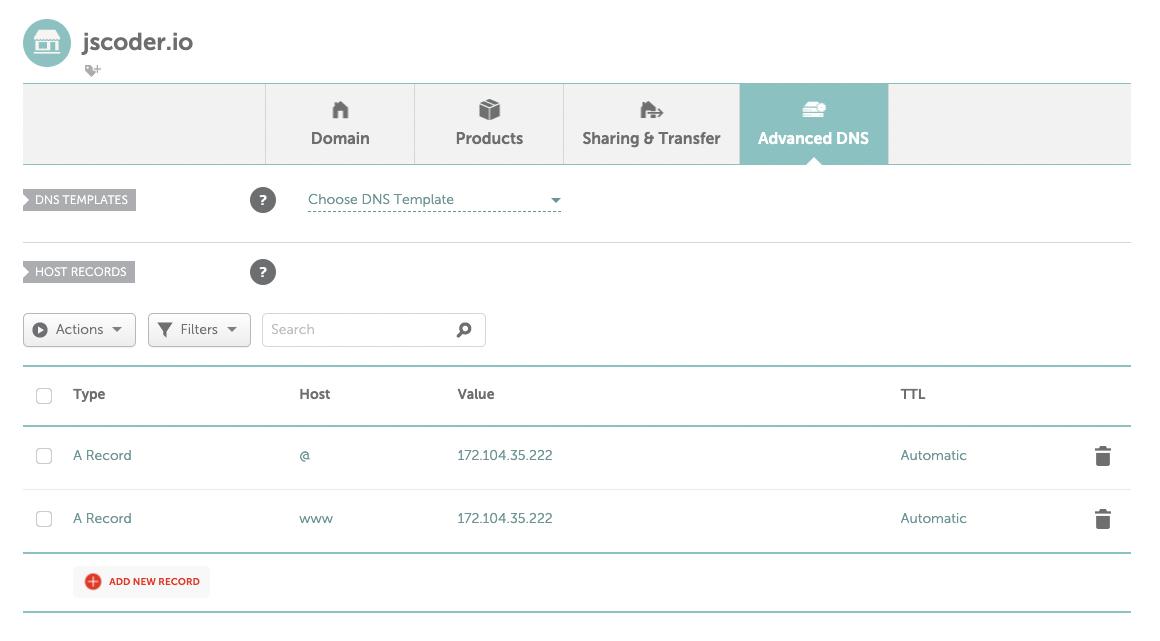
Well, what we need is more human readable address https://jscoder.io, not a series of digital chunk like http://172.104.35.222/ (that's why we have "domain name"). The magic happens by configuring DNS to connect jscoder.io to 172.104.35.222.
Click the Manage button of your domain name on the NameCheap Domain List, then switch to the tab Advanced DNS. Add 2 new records as followed:
Apply the changes and wait for a few minutes, visit http://jscoder.io. Great, we have got it working:
6. Config HTTPS
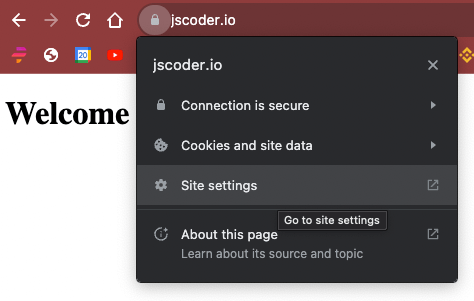
Now are we good with the website? Not enough. If you look closely, there is a warning about insecure connection.
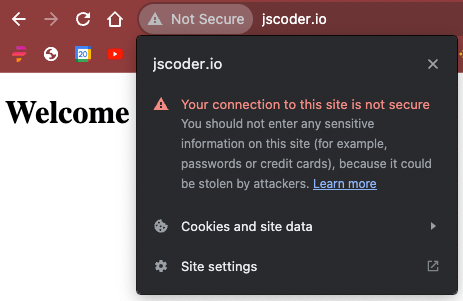
HTTPS is an important protocol to encrypt transferred data based on the HTTP protocle. Data going between client side and server side goes through multiple intermediate nodes, where it could be sniffed and known by others who may be bad guys. For example, when you are querying your bank account balance, or transfer money, this kind of data leakage could result in severe finance lost. Nowadays, HTTPS is nearly a standard configuration to protect users. With HTTPS, the data being transferred is always encrypted. Hackers cannot know what the real info is even if they have got the data. For more about HTTPS, please check https://en.wikipedia.org/wiki/HTTPS.
6.3 Buy a certificate
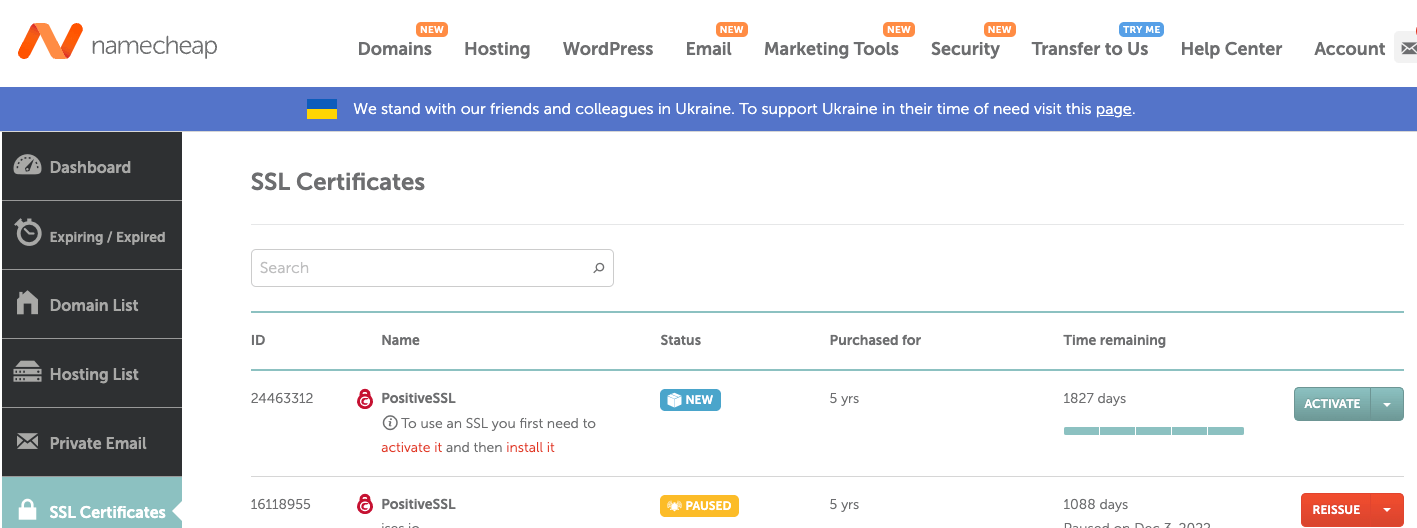
There are some service providers that allow you to create and use free HTTPS certificates, such as AWS and Vercel. But the certificates can only be used on their platforms seamlessly. Alternatively, there are also some free HTTPS online like Let's Encrypt, but here let's apply for a certificate on NameCheap SSL Certificates. For simple website like ours, choose the cheapest PositiveSSL. The cose is $5.99 per year.
After buying the certificate, you will get a NEW certificate on the SSL Certificate List:
6.4 Activate SSL certificate
Now we need to deploy this certificate on our Linode server, making it support HTTPS protocle. Before using it, we have to "activate" it. This step ensures the certificate has been deployed to the right place (not the hacker's computer). Clicks the Activate button of the new SSL certificate. First, you will get a warning about "renewing the SSL certificate annually":
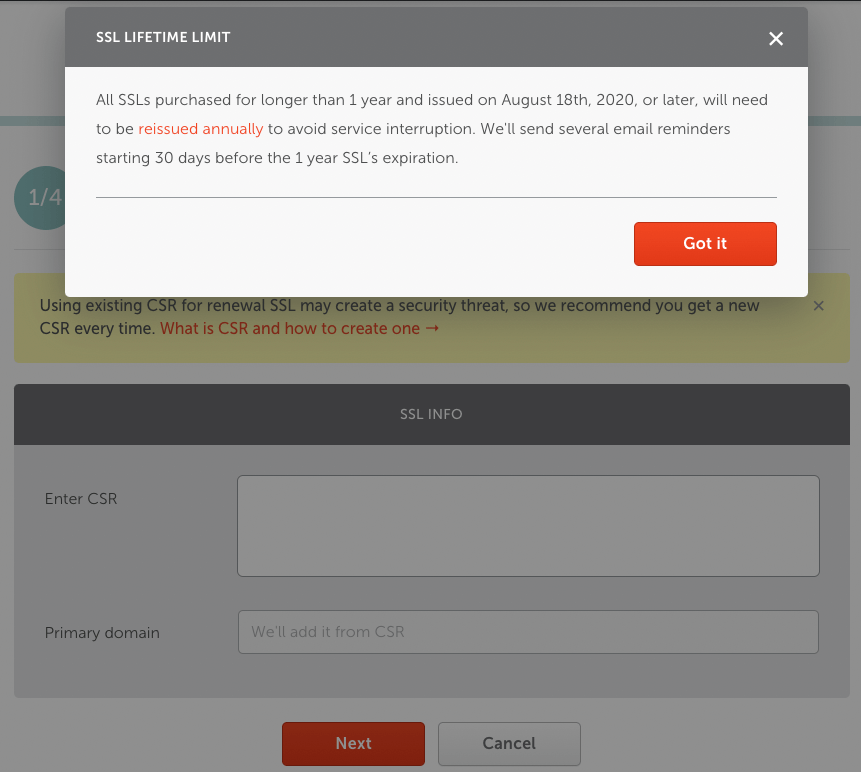
It says:
All SSLs purchased for longer than 1 year and issued on August 18th, 2020, or later, will need to be reissued annually to avoid service interruption.
To activate a SSL certificate, we need to go through 4 steps.
1/4 Enter CSR & domains PositiveSSL will cover
We will need to generate a CSR code. According to How to generate CSR (Certificate Signing Request) Code:
CSR code (Certificate Signing Request) is a specific code and an essential part for the SSL activation. It contains information about website name and the company contact details. For many reasons, the code should be created on the hosting server end. On some servers, it is the obligatory condition.
Follow the doc above, there are dozens of way to generate CSR code. Depending on our server type (Ubuntu), we visit the page Generating CSR on Apache + OpenSSL/ModSSL/Nginx + Heroku. In short, run the command line on your server terminal:
You will be prompted to answer a few questions, which are information to be disclosed to the public. An example run is like:
Copy the text content of file jscoder-ssl.csr generated above. Paste to the inputbox of NameCheap validation wizard, click "Next".
Note: the command above generates another file
jscoder-ssl.keyas well. Keep it and we will use it at a later step.
2/4 Confirm that you own the domain
This step simply selects Domain Control Validation (DCV) method. For a detailed documentation, check page How to complete DCV →. There are 3 validation methods, we choose the option "Upload a validation file" and click "Next".

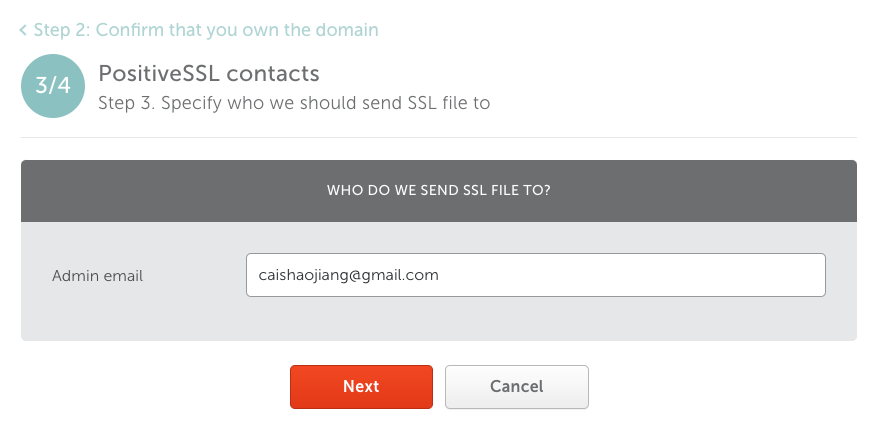
3/4 PositiveSSL contacts
This step is trivial. Simple put your email address to receive the activated SSL certificate.
4/4 Review & submit
Review and submit your activation request now.
Upload validation file to our Linode server
After submitting your activation request, the SSL certificate status becomes "Pending". Now we will need to download the activation file, put it to our Linode server as /var/www/html/.well-know/pki-validation/AD1BABB3080BA0092721E9CE68601EBD.txt:
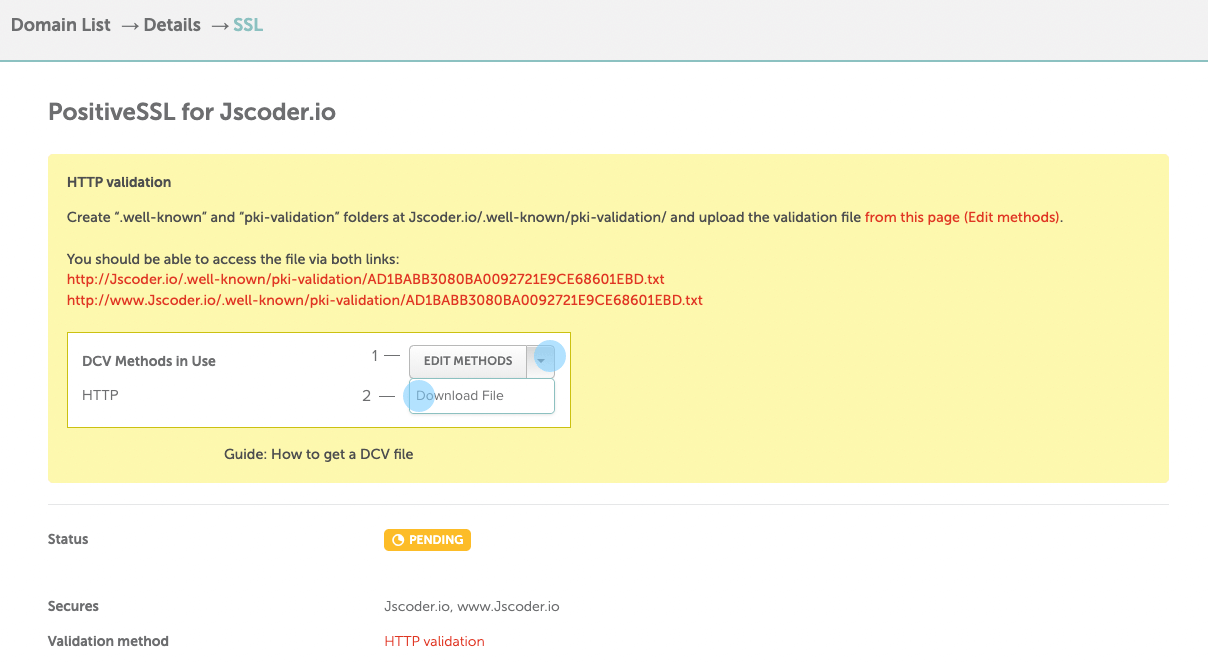
Follow the instruction above, click the link from this page (Edit methods) (in the screenshot), click the "Download File" link to download the validation file:
The validation file is a text file, simply create a blank file /var/www/html/.well-know/pki-validation/AD1BABB3080BA0092721E9CE68601EBD.txt, copy the content of the validation file over. Then you should be able to view the validation file through link http://jscoder.io/.well-known/pki-validation/AD1BABB3080BA0092721E9CE68601EBD.txt:

Then we will wait for NameCheap to visit the link http://jscoder.io/.well-known/pki-validation/AD1BABB3080BA0092721E9CE68601EBD.txt. By validating the content of this link periodly, NameCheap knows "Oh right, the certificate applicant does have access right to the server of http://jscoder.io". Then NameCheap will pass the validation and make the certificate status "Active".
Note: it may take up to 1 hour to wait for NameCheap to pass the validation. Please be patient.
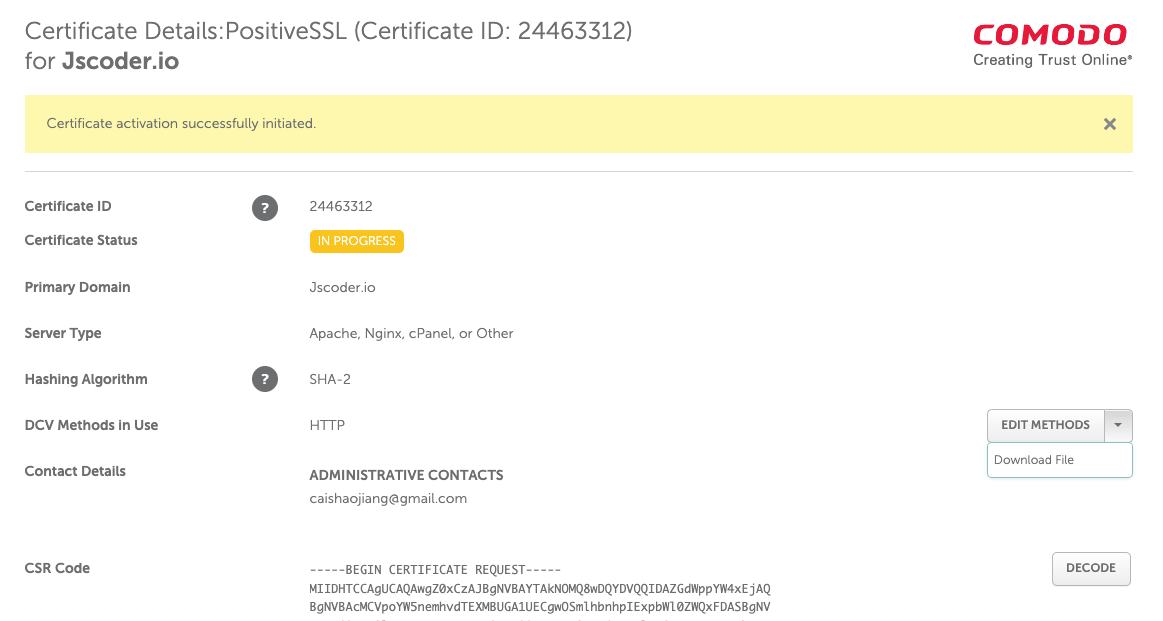
Meanwhile, you should receive an email regarding the issued certificate:

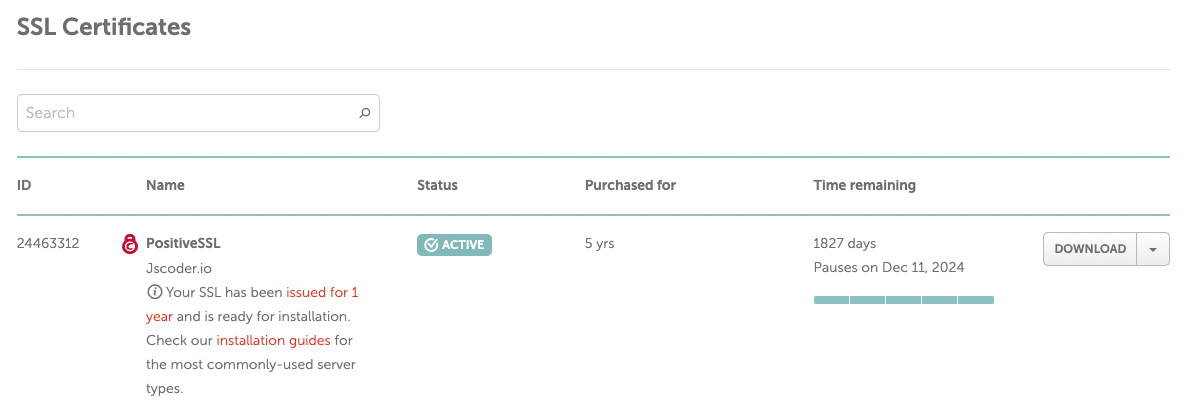
Up to now, we have bought a SSL certificate and validated it. So the certificate is ready to use. We will next deploy the certificate on our Linode server.
6.5 Deploy the SSL certificate
Great, we are reaching to the success now. Download the SSL certificate file either from NameCheap dashboard or from your email. It's a zip file with 3 files inside: jscoder_io.ca-bundle, jscoder_io.crt and jscoder_io.p7b. What we need to deploy is jscoder_io.crt. Copy it over to the server at the folder /root. Here I use scp command:
OK, now the certificate file is on the Linode web server. How to configure it? Modify the nginx configuration file to use the SSL certifcate. The default nginx configuration file is /etc/nginx/sites-enabled/default. I recommend you to backup the file before updating it. Open the file with Vim, edit it to be like:
It does 3 things:
Make nginx listen to port 443, instead of 80.
Define directive
ssl_certificateto point to/root/jscoder_io.crt;Define directive
ssl_certificate_keyto point to/root/jscoder-ssl.key. This file was created before at session Activate SSL certificate step 1.
Finally, restart nginx by service nginx restart. Then we are all set !
Visit https://jscoder.io, you will see:
7. Conclusion
Setting up your own website may seem daunting initially, but with the right guidance and assistance, the process becomes much more manageable. By following these steps, you'll be well on your way to setup your first website. Remember, building a website is an ongoing process, so continuous learning, regular updates, and monitoring your site's performance are essential for long-term success. Good luck with your website journey!